
How to Install Kubernetes on a Bare Metal Server: A Step-by-Step Guide
Kubernetes has become the de facto standard for container orchestration, providing powerful tools to deploy, manage, and scale containerized applications. While many developers and businesses are familiar with running Kubernetes on cloud platforms like AWS, Google Cloud, or Azure, there are times when installing Kubernetes on a bare metal server is the best choice for achieving full control over your infrastructure, improving performance, and reducing costs.
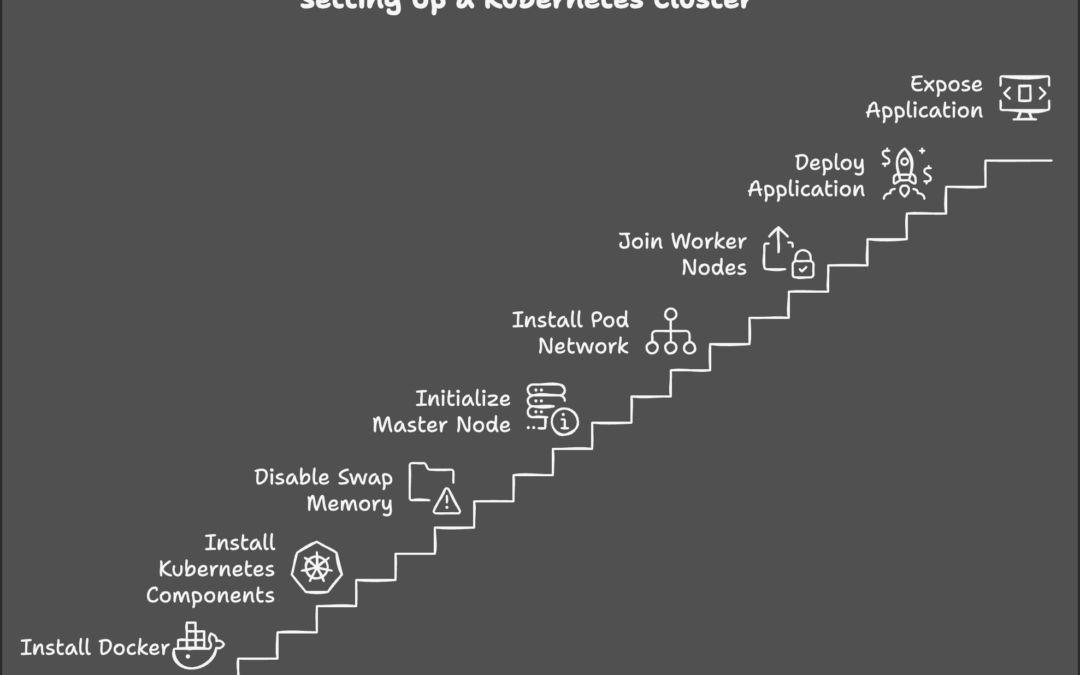
In this guide, we’ll walk you through the process of setting up Kubernetes on a bare metal server, covering everything from the initial setup to the installation of essential components and creating your first Kubernetes cluster.
Why Use Kubernetes on Bare Metal?
Before diving into the installation process, it’s important to understand the advantages of running Kubernetes on a bare metal server:
- Better Performance: Bare metal servers typically provide better performance since you’re working directly with physical hardware without the overhead of virtualization.
- Cost Efficiency: For high-demand applications, running Kubernetes on your own hardware can often be cheaper than using cloud instances, especially for large-scale deployments.
- Full Control: Bare metal setups give you complete control over the hardware and the network, which can be critical for specific use cases, such as running legacy applications or complying with strict regulatory requirements.
Prerequisites
Before you start, ensure that you have the following:
- Bare Metal Servers: At least one server (preferably more for high availability). This guide assumes you have a minimal understanding of Linux and networking.
- Linux Operating System: Kubernetes supports most Linux distributions, but Ubuntu or CentOS are commonly used.
- Root Privileges: Ensure you have root access to the servers.
- Networking Setup: A private IP range for your nodes and appropriate firewall settings. Ensure your servers can communicate with each other.
- Docker: Kubernetes requires Docker or another container runtime to run containers.
Kubernetes relies on Docker (or a similar container runtime) to run containers. We’ll begin by installing Docker on all nodes.
For Ubuntu:
sudo apt update
sudo apt install -y docker.io
sudo systemctl enable docker
sudo systemctl start docker
For CentOS:
sudo yum install -y docker
sudo systemctl enable docker
sudo systemctl start docker
After installing Docker, confirm that it’s running correctly:
sudo systemctl status docker
Step 2: Install Kubernetes Components
Kubernetes has three main components you need to install:
- Kubelet – The agent that runs on each node in the cluster.
- Kubeadm – A tool for managing Kubernetes clusters.
- Kubectl – The command-line interface for interacting with the Kubernetes cluster.
To install Kubelet, Kubeadm, and Kubectl on all nodes:
For Ubuntu:
sudo apt update && sudo apt install -y apt-transport-https curl
curl -s https://packages.cloud.google.com/apt/doc/apt-key.gpg | sudo apt-key add -
echo "deb https://apt.kubernetes.io/ kubernetes-xenial main" | sudo tee -a /etc/apt/sources.list.d/kubernetes.list
sudo apt update
sudo apt install -y kubelet kubeadm kubectl
sudo apt-mark hold kubelet kubeadm kubectl
For CentOS:
cat <<EOF | sudo tee /etc/yum.repos.d/kubernetes.repo[kubernetes]
name=Kubernetes baseurl=https://packages.cloud.google.com/yum/repos/kubernetes-el7-x86_64 enabled=1 gpgcheck=1 repo_gpgcheck=1 gpgkey=https://packages.cloud.google.com/yum/doc/yum-key.gpg https://packages.cloud.google.com/yum/doc/rpm-package-key.gpg EOF sudo yum install -y kubelet kubeadm kubectl –disableexcludes=kubernetes sudo systemctl enable –now kubelet.
Step 3: Disable Swap Memory
Kubernetes requires that swap memory be disabled on all nodes in the cluster. This is crucial to ensure that the Kubernetes scheduler works correctly.
To disable swap on Ubuntu/CentOS:
sudo swapoff -a
To make this change permanent, you need to edit /etc/fstab and remove or comment out any swap entries.
Step 4: Initialize the Kubernetes Master Node
Once Docker and Kubernetes components are installed on all your servers, it’s time to initialize the master node.
Run this command on the master node (the first node you want to set up in the cluster):
sudo kubeadm init --pod-network-cidr=10.244.0.0/16
This will initialize the Kubernetes master node and set up the control plane. The output will provide a kubeadm join command that you’ll use to join worker nodes to the cluster. Save this token as it will be needed later.
Once initialization is complete, run the following commands to set up kubectl for the root user (or your chosen non-root user):
mkdir -p $HOME/.kube
sudo cp -i /etc/kubernetes/admin.conf $HOME/.kube/config
sudo chown $(id -u):$(id -g) $HOME/.kube/config
Test your setup by checking the status of your nodes:
kubectl get nodes
You should see the master node with the status Ready.
Step 5: Install a Pod Network
Kubernetes needs a network overlay to allow communication between pods across nodes. One of the most popular network solutions is Flannel, but you can choose from several options (e.g., Calico, Weave).
For Flannel, run this command on the master node:
kubectl apply -f https://raw.githubusercontent.com/coreos/flannel/master/Documentation/kube-flannel.yml
After a few moments, check that the pods in the kube-system namespace are running correctly:
kubectl get pods --all-namespaces
You should see kube-flannel pods in a Running state.
Step 6: Join Worker Nodes to the Cluster
Now it’s time to join the worker nodes to the Kubernetes cluster.
On each worker node, run the kubeadm join command that was generated earlier (during the initialization of the master node):
sudo kubeadm join <master-node-ip>:6443 --token <token> --discovery-token-ca-cert-hash sha256:<hash>
Once the worker nodes join the cluster, check their status from the master node:
kubectl get nodes
You should see the worker nodes listed alongside the master node, all with the status Ready.
Step 7: Deploying Your First Application
Now that you have a Kubernetes cluster running on your bare metal servers, you can deploy your first application!
Create a simple deployment.yaml file for a sample Nginx application:
apiVersion: apps/v1
kind: Deployment
metadata:
  name: nginx-deployment
spec:
  replicas: 2
  selector:
    matchLabels:
      app: nginx
  template:
    metadata:
      labels:
        app: nginx
    spec:
      containers:
      - name: nginx
        image: nginx
        ports:
        - containerPort: 80
Apply the deployment to your cluster:
kubectl apply -f deployment.yaml
Check the status of the deployment:
kubectl get pods
You should see the Nginx pods running.
Step 8: Expose the Application
To access your application from outside the cluster, you need to expose it using a service:
kubectl expose deployment nginx-deployment --type=NodePort --port=80
This will expose the Nginx application on a dynamic port. To find the assigned port:
kubectl get services
Access the Nginx application by navigating to http://<node-ip>:<node-port> in your browser.
Conclusion: Kubernetes on Bare Metal
You’ve successfully set up a Kubernetes cluster on bare metal servers! With Kubernetes managing your containers, you can now scale applications, handle failover, and automate deployment processes all within your own infrastructure. Whether you’re optimizing for performance, cost, or control, this setup provides a robust foundation for any containerized workloads.
Stay Updated
For more cloud-native tips, containerization guides, and Kubernetes insights, subscribe to our newsletter!
This blog post is designed to provide a practical, hands-on guide for readers wanting to deploy Kubernetes on bare metal servers. Feel free to adapt it with more advanced topics or customization options depending on your audience’s needs!