
Managing applications on Kubernetes, especially with Helm Kubernetes, can be complex and time-consuming as your environment grows. Whether you’re deploying simple applications or managing a complex microservices architecture, having an efficient way to handle Kubernetes resources is crucial. This is where Helm comes in to simplify the process.
In this blog post, we’ll explore what Helm is, why you should use it, the pros of using it, and provide a simple example to help you get started.
Prerequisites
Before you start using Helm, ensure you have the following:
- Kubernetes Cluster: A running Kubernetes cluster (e.g., Minikube, AKS, EKS, or GKE). If you’re setting up Kubernetes on a bare-metal server, follow this detailed guide: How to Install Kubernetes on a Bare-Metal Server.
- kubectl Installed: The Kubernetes command-line tool (
kubectl) should be installed and configured to connect to your cluster. - Helm Installed: Download and install Helm on your local machine. Follow the installation guide here.
- Basic Kubernetes Knowledge: Familiarity with Kubernetes concepts like Pods, Deployments, and Services.
These prerequisites will help you smoothly follow the steps and examples in this blog.
What is Helm?
Helm is a package manager for Kubernetes, often referred to as the “Kubernetes package manager.” It simplifies the process of deploying, managing, and updating applications on Kubernetes clusters. Helm allows you to define, install, and upgrade even the most complex Kubernetes applications using charts. A Helm chart is a package of pre-configured Kubernetes resources that describe an application and its dependencies.
Think of Helm as the “apt” or “yum” of Kubernetes, but instead of installing operating system packages, Helm manages your Kubernetes applications.
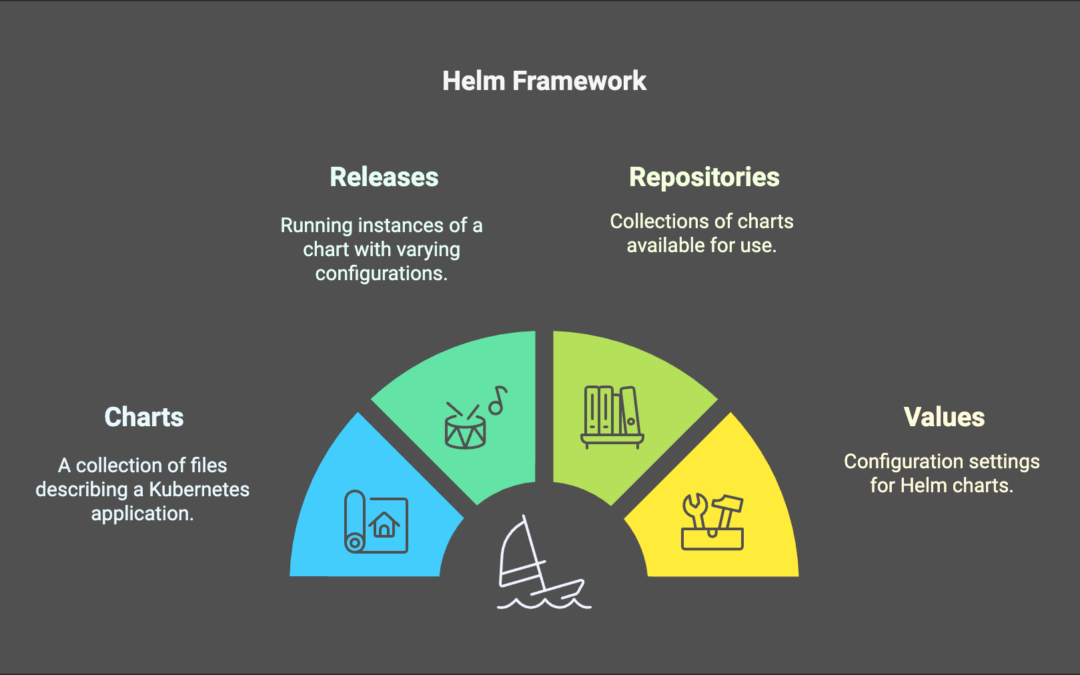
Key Concepts in Helm:
- Chart: A Helm chart is a collection of files that describe a Kubernetes application. It contains all the necessary configuration to deploy an app (including its dependencies, services, and configurations).
- Release: A release is a running instance of a chart. You can have multiple releases of the same chart, each with different configurations.
- Repository: A Helm repository is a collection of charts, which you can download and use. There are public repositories like the Helm Hub, or you can create your own private repositories.
- Values: Values are the configuration settings that can be passed to a Helm chart, either as default values or user-defined overrides.
Why Use Helm?
Helm solves many challenges that come with managing Kubernetes applications. Here are some of the reasons why you should consider using Helm:
1. Simplifies Kubernetes Deployments
Without Helm, deploying an application on Kubernetes requires writing multiple YAML files for various resources such as Pods, Services, Deployments, ConfigMaps, and more. This can quickly become overwhelming, especially when you have complex applications. Helm simplifies this process by packaging all Kubernetes resources into a single chart, making it easier to install, upgrade, and manage.
2. Easy to Install and Update Applications
Helm allows you to easily install or upgrade applications in your Kubernetes cluster. For example, when a new version of an application is available, you can update it with a single Helm command. This eliminates the need for manually updating Kubernetes manifests and ensures consistency across your environment.
3. Reusability and Shareability
Helm charts allow you to reuse configurations, so you don’t need to start from scratch every time you deploy an application. You can share your charts with others or use charts from the community or repositories like the Helm Stable Repository.
4. Manage Complex Applications with Dependencies
For larger applications, you might need to manage multiple services, databases, and microservices. Helm charts can include other charts as dependencies, making it easy to deploy complex applications with multiple components. Helm handles the installation of dependencies automatically, ensuring that everything is set up correctly.
5. Rollback Capabilities
Helm also provides easy rollback functionality. If something goes wrong after an upgrade or installation, you can quickly revert to a previous version of your release.
Pros of Using Helm
Pros:
- Simplicity: Helm makes deploying Kubernetes applications easy and efficient.
- Reusability: Helm charts can be reused, shared, and customized for different environments.
- Version Control: Helm allows you to version your deployments, making it easier to manage and track changes over time.
- Rollback Support: With Helm, rolling back to a previous release is simple and ensures you can restore a working version quickly.
- Consistency: Helm charts provide a consistent way to define, deploy, and manage applications across your clusters.
Simple Example: Deploying Nginx with Helm
Let’s walk through a simple example of deploying an Nginx web server using Helm. This will help you understand how Helm works and how easy it is to deploy applications.
Step 1: Install Helm (if not already installed)
First, install Helm on your machine. You can follow the instructions for your OS here.
Follow the procedure below to download and install Helm on Windows:
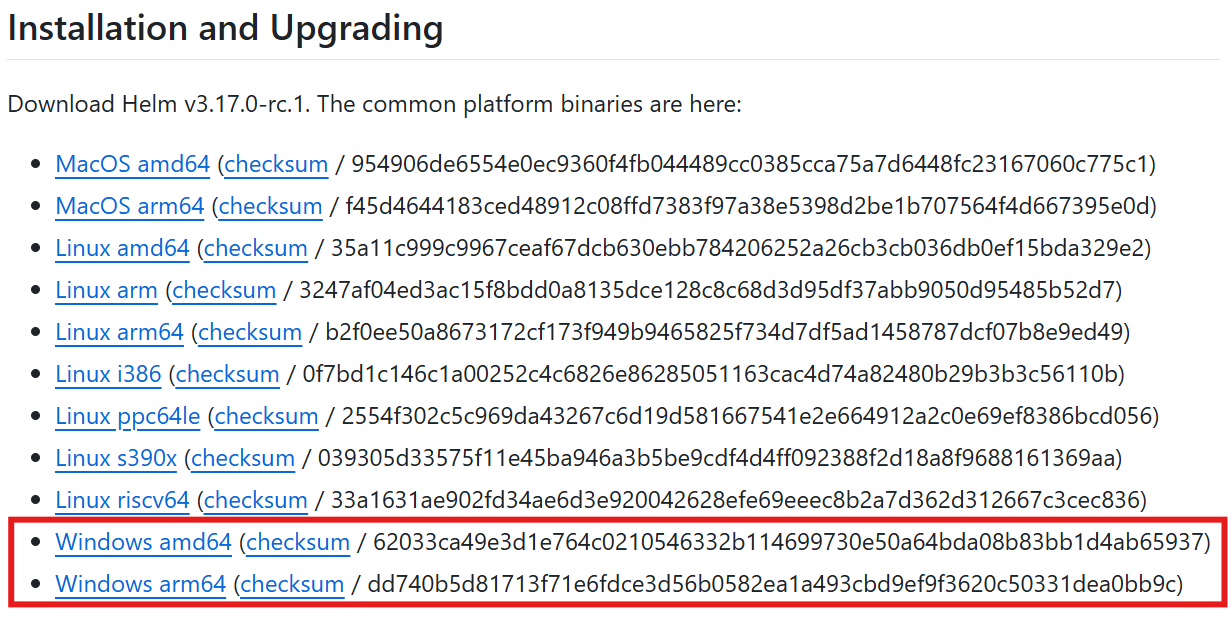
1. Visit the official Helm releases page on GitHub.
2. Select the Windows download link corresponding to your system’s architecture. Wait for the download to finish.
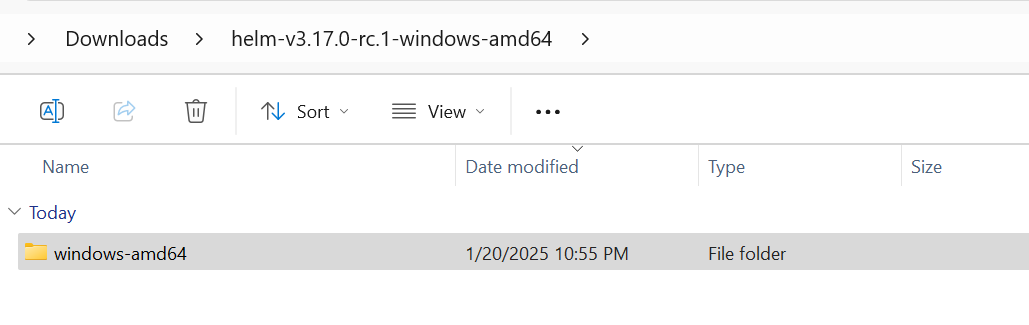
3. Extract the ZIP file to the preferred location.
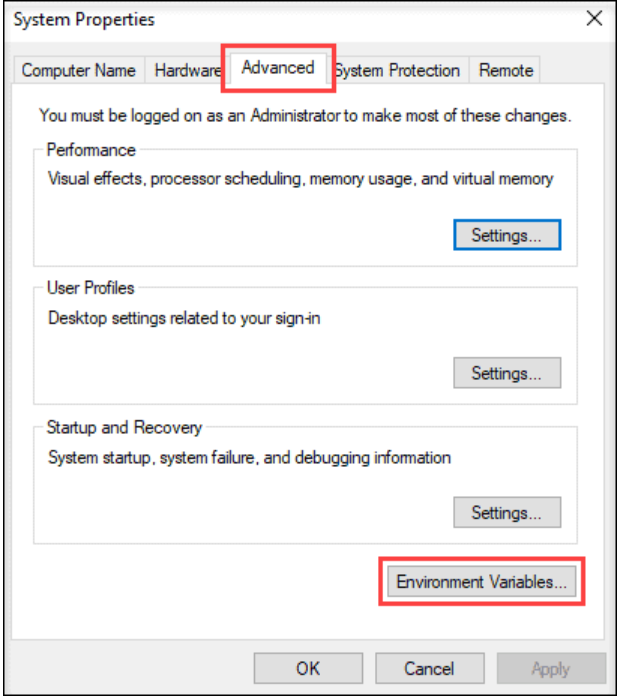
4. In the Run prompt (Win+r), type sysdm.cpl and click OK.
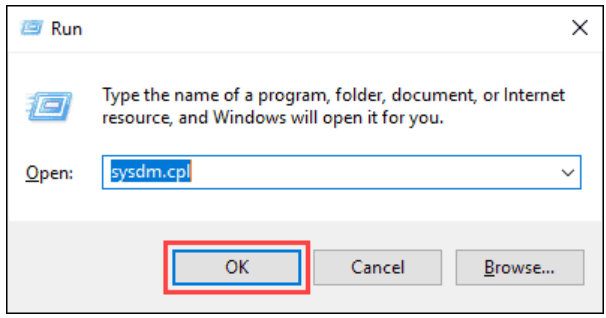
5. In the Advanced tab of the System Properties, select Environment Variables.
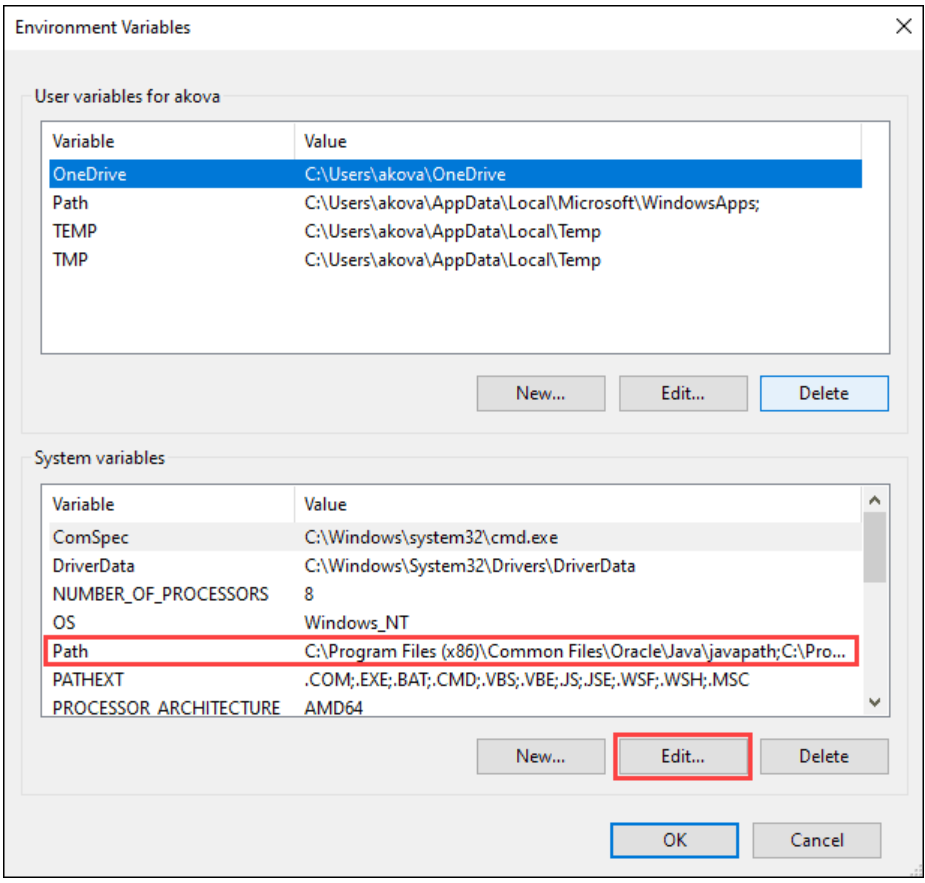
6. Select the Path variable and click Edit.
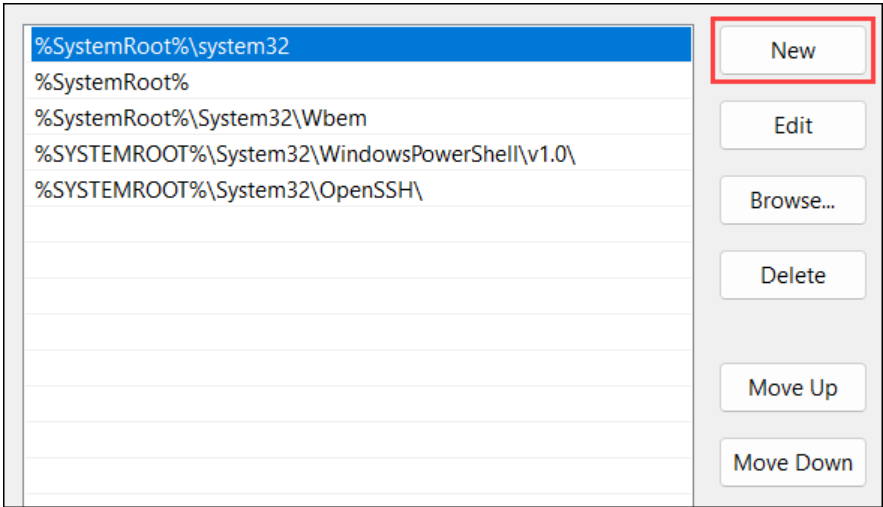
7. Select New and input the location of the Helm binary. Press Enter to confirm.
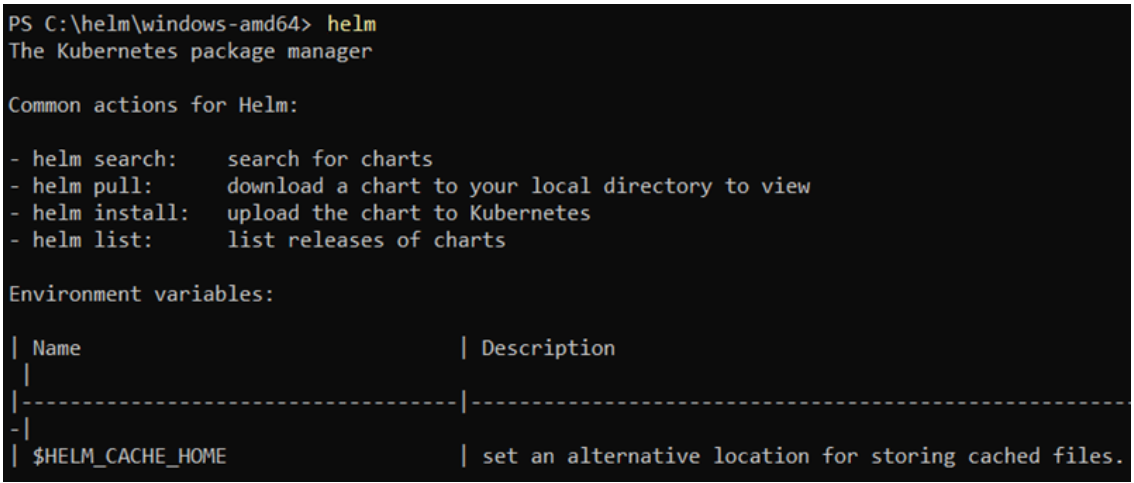
8. Open the command line window and enter the helm command to verify that you have access to Helm.
Step 2: Add the Helm Repository
Before you can use Helm to deploy Nginx, you need to add a repository that contains the Nginx chart. The official Helm chart repository is a good place to start.
helm repo add stable https://charts.helm.sh/stablehelm repo update
Step 3: Install the Nginx Chart
Now that you have added the repository, you can install the Nginx chart with a simple command. This will create a Kubernetes deployment, a service, and other necessary resources.
helm install my-nginx stable/nginx-ingress
Here:
my-nginxis the name of the Helm release.stable/nginx-ingressis the name of the chart.
Step 4: Verify the Installation
Once the chart is installed, you can verify that the Nginx resources have been deployed successfully by checking the status of the release:
helm list
You should see my-nginx in the list of deployed releases.
Step 5: Upgrade the Nginx Chart
If you want to upgrade the Nginx deployment (for example, to a new version of the chart), you can run the following command:
helm upgrade my-nginx stable/nginx-ingress
Step 6: Uninstall the Nginx Release
When you are done, you can uninstall the Helm release with the following command:
helm uninstall my-nginx
This will remove all the Kubernetes resources associated with the Nginx deployment.
some more commands :
How do you list deployed releases?
helm ls or helm list
How to execute a rollback?
helm rollback RELEASE_NAME REVISION_ID
How to view revision history for a certain release?
helm history RELEASE_NAME
How to upgrade a release?
helm upgrade RELEASE_NAME CHART_NAME
Conclusion
Helm is a powerful tool that simplifies the process of deploying and managing applications on Kubernetes. Whether you’re deploying a simple app or managing a complex microservices architecture, Helm makes it easy to handle configuration, updates, rollbacks, and dependencies.
While Helm has a learning curve, especially when creating custom charts, its ability to automate and simplify Kubernetes management makes it an invaluable tool for both developers and DevOps teams. Give Helm a try in your next Kubernetes project, and see how it can streamline your application deployments!